Transfer 8 mm and Super 8
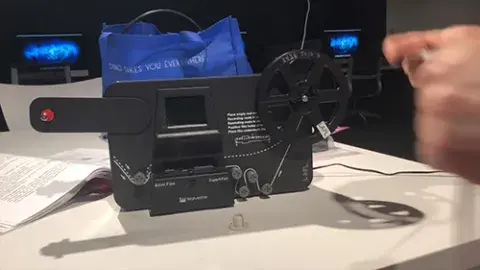
Check out the Wolverine Data Film2Digital MovieMaker-PRO from Octavia Lab staff. It is a standalone unit that you may plug into the power outlets at the Octavia Lab work tables.
Note:
- You will need an SD card (no larger than 32 GB) to save your video.
- The scanner creates HD 1080p MP4 video at 20 frames per second.
- The scanner does not capture sound (however, most home movies were shot without sound).
- It takes 10 minutes to scan 1 minute of film.
Video tutorial for how to use the Wolverine Moviemaker-Pro
Getting Started
Preparing the Film
If your film is not in good condition (e.g., broken, sticky, smells like vinegar, has ruptured sprocket holes, misaligned, bent) please consult with a conservator. Otherwise, film may:
- become stuck on the film track,
- damage/jam/stop the MovieMaker Pro, or
- produce poor quality or jittery videos.
Some older films may have been wound too tight. The MovieMaker Pro may be used to rewind such films back and forth to regain proper winding tightness before converting them. Tight-wound film may cause jitter in transferred videos.
We strongly recommend before transferring your films, to use a lint-free cloth and/or anti-static film cleaner to remove and clean dirt particles, chemical residues, or any scattered mildew on the film in order to avoid poor quality video or stoppages during the recording process.
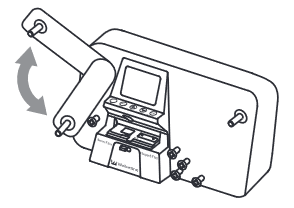
Swinging Up/Down the Arm
Swing up the arm to mount reel; push down the arm for storage purposes.
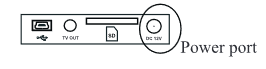
1. Attach Power Cord
Plug in the included DC 12V power adapter.
2. Insert SD/SDHC Memory Card, Maximum 32 GB
Insert an SD/SDHC memory card (maximum storage size: 32 GB or less) before powering on the MovieMaker Pro device.
- Using a Micro SD card with adapter, or SDXC card, or memory card that is 64 GB or above capacity, which is not compatible with MovieMaker Pro, will lead to a Card error message to appear on the screen. The MovieMaker Pro can only take an SD/SDHC memory card up to 32 GB maximum.
- Make sure the SD/SDHC card is unlocked (white tab in forward position).
- Insert and push the SD/SDHC card inward until it clicks. Improper insertion may damage the card reader or the SD/SDHC Card.
- To dismount/eject the SD/SDHC card, first push the card in, then release, instead of pulling it out directly. MovieMaker Pro will power off automatically if the SD/SDHC card is being mounted/dismounted.
3. Turn on/off MovieMaker Pro
Press the power button to turn MovieMaker Pro on/off.
4. Clean the Light Table
Push the film door tab left to flip open the door. Use included brush to clean the light table very gently.
5. Mount the Reels and Film
If your film reel has an 8 mm mounting hole, mount the reel directly to the left shaft. Otherwise, use the provided red color reel adapter. If adapters are needed, always place the red color adapter on the LEFT side, and GRAY color adapter on the RIGHT side.
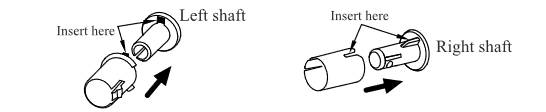
- Mount empty reel on to the right shaft.
- Follow the Film Routing Diagram printed on the face of MovieMaker Pro to route the film. We strongly recommend users to follow the presented winding scheme to generate better quality videos.
- Slide open the flap door, and position film sprocket holes at the top. Place film underneath the 3 white tabs. Otherwise, recorded videos will be jittery.
- Steps to place film on table:
- Place and hold film underneath Tab #1
- Twist film slightly and clip film underneath Tab #2
- Twist film slightly and clip film underneath Tab #3
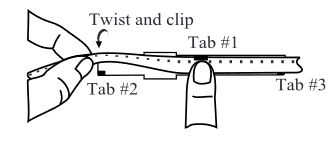
- Make sure the film is properly placed underneath all 3 white tabs, then close the flap door.
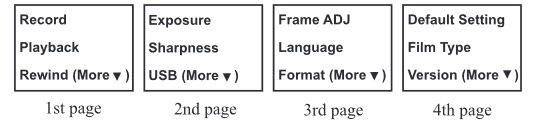
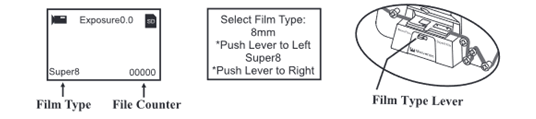
6. Menu Selections
Press the Menu button. Use the Up or Down arrow buttons to highlight the Menu selection and then press Enter.
Note:
If non-default settings are needed, any adjustments or value changes need to be done before transferring.
Record
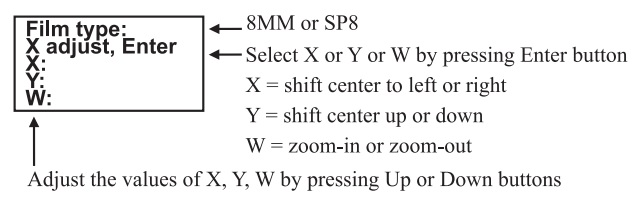
- Slide the Film Selection Lever to the left (8 mm) or right (Super 8) to select proper film type. Then press the Enter button.
- Press Enter (also used for Start and Stop) button to start recording. While recording is in process, a red dot at upper left corner blinks.
- Press the Enter button to stop recording.
- The film reel counter at the lower right corner will increase by one after each recording stops.
Frequently Asked Questions
Q: My film has imperfect splices, is bent, or has broken sprocket holes; it became stuck and won't advance through the machine.
A: Open the flap door and let the problem frames advance and clear the track table. Then close the flap door and continue to record.
Q: Some segments of recorded video show up jittery and some are not.
A: Your film may have been played on a projector too many times, causing the sprocket holes to become worn. Some of them may not be rectangular (see picture below). In cases like this, each frame of the film is anchored in a slightly different location at the Light Table of the MovieMaker-Pro, which causes jittery video as a result. You can forward the film first, and record/convert the film while the film winds backward (using the good edge of sprocket holes to advance the film and record the film in reverse). Then play video backwards to convert/save the video. Many video editing programs have a reverse feature that can be used on the file to play in the correct direction.

Q: My film won't go through the MovieMaker.
A: Some old film came a little wider than 8mm at some sections due to loose manufacturing standards, and causes difficulty with the Wolverine pulling the film through the track table. A trick is to keep the flap door from closing all the way; this may help overcome the problem of slightly wider film going through the track table.
Q: The speed of the video is too fast/slow. Can I change it?
A: Users who wish to modify playback speed of the video from the default 20 fps may use video editing software to edit and save to the desired playback speed.
Playback
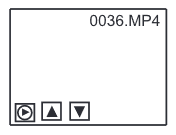
- Press the Menu button, highlight the Playback selection, then press the Enter button.
- Press the Up or Down arrow button to select the film file to be played back, then press the Enter button.
- Press the Enter button to pause the playback.
- Press the Menu button one time to enter Edit mode. Highlight Return (go back to Playback) or Delete ( delete the current file).
- Press the Menu button twice to go back to Record mode or Main/Home menu.
Note for Mac users:
Mac computers will create and add hidden files to the SD/SDHC memory card each time a user plays back recorded MP4 movie files on the Mac. With the hidden files or modified MP4 files stored on the SD/SDHC memory card, MovieMaker Pro can no longer Playback movies on the above SD card. A No File message will be displayed on the Viewer instead.
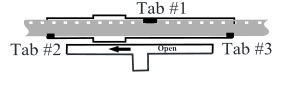
Rewind
- Remove film from Light Table and swap reels. Place the empty take-up reel on the right side shaft and place sprocket holes on the outside ( as shown). If a reel adapter is needed, always place the gray adapter on the right side/take-up reel.
- Follow the film rewind routing diagram (the dotted lines) printed on the MovieMaker Pro and follow the instructions on the screen.
- Press the Enter button to Start/Stop the rewinding process.

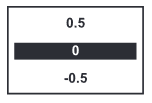
Exposure
Exposure Value (AKA brightness) needs to be adjusted before recording if the default setting (0.0) is not sufficient.
- Adjustable exposure range is from 2.0 to -2.0.
- Press the Up or Down buttons to change the value and press Enter to complete the change.
- The default setting is 0.0. Negative values provide a darker effect, while exposure 2.0 shows the brightest result.
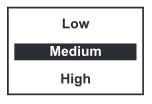
Sharpness
If sharpness adjustment is needed, make the change before recording.
- Sharpness range is from Low to High. The default setting is Medium.
- Press the Up or Down buttons to change the value and press the Enter button to complete the change.
USB
Plug in the included USB cable to upload recorded MP4 files to another device. The SD/SDHC memory card is read as an External Drive, called NO_NAME drive (G:)*. The stored MP4 files are located under the directory of FilmScanner/MOVIE.
*Note: (G:) drive may vary from computer to computer.
Frame ADJ (Adjustment)
If your film is off-center, you can make adjustments of the Movie Register (the film center, X and Y and zoom-in/out factor on the screen). If frame adjustments are needed, make the changes before recording.